Manual for Bold. Premium WordPress Theme
First of all: Thank you for purchasing one of our Premium WordPress themes! We really appreciate that and hope you enjoy working with it.If you want to get news about themeupdates, new releases as well as other important news sign up to our Email newsletter or follow us at Facebook or Twitter.
Please read also our FAQs on topics like:
Table of Content
About this manual
This document describes the abilities of the theme and helps you to set up the themedemo. Please read it carefully and post in our dedicated support forum at http://support.colibri-interactive.com if you have an unanswered question.Setup: WordPress
Before you can set up this theme you need a working version of WordPress installed. For further information about how to set up WordPress please see the WordPress Codex Website.The latest version of WordPress is available for download at: https://WordPress.org.
Setup: Theme
First you need to upload the theme files and then activate it.To upload the files you can choose between uploading the files with a FTP application and the WordPress Uploader.
FTP Application
Upload the unzipped theme files via an FTP application to your server into your WordPress installation to /wp-content/themes.
WordPress Uploader
Alternatively, you can use the WordPress Uploader you'll find at Appearance > Themes > Add New > Upload Theme. Then click the browse button and select the theme zip file. After that click 'Install Now.
Please note: If you get the error that the style.css file can not be found you have uploaded the wrong zip file. Please make sure that you're uploading the theme zip file and not the "complete theme pack" zip file! If you've downloaded the theme pack zip file you need to unzip it first and use the theme zip file which is included.
Activate the theme
To activate the theme navigate to Appearance > Themes, hover the themes thumbnail and click Activate.
Install required & recommended Plugins
After the activation of the theme the "Plugin Installation Notification Dashboard" will appear at the top of every page in the backend. It notifies you of required and recommended plugins to get the best out of the theme and helps you to install and activate them.
Click on > Begin installing plugins. Tick all plugins and select from the dropdown "Bulk Actions" the "Install" option, then click on > Apply. The download and installation of the plugins can take a moment, depending on your server. Please be patience.
When all plugins are installed you need to activate them to use them. Click the link >Return to Required Plugin Installer, at the bottom of the page. Tick all plugins again and select the "Activate option from the dropdown", then click >Apply.
The theme is completely set up now and you can start adding your own content or follow the instructions to setup one of our themedemos.
If you're not familiar with WordPress we recommend to setup a themedemo and replace its content with yours afterwards.
Setup: Themedemo
To set up the themedemo you need to install three plugins. Click here to read how to install a plugin.One is to import the content of the themedemo such as pages, the navigation and the products, the second is to import the content of the widgets used in the themedemo and the third is to import the settings of the customization page such as colors etc.
Please install the WordPress Importer, the Widget Importer & Exporter and the Customizer Export/Import plugin.
The democontent can be found in the "All files & documentation" version of the theme. You can redownload the theme at any time from your download page at Themeforest. Unzip that file and look for the folder "themedemo-content". In there you will find each of the themedemos in separate subfolders. If you're using a fresh WordPress with demo content you have some default widgets that we need to remove first. Navigate to > Appearance > Widgets and remove all widgets from all widget areas.
Importing the content
After the installation of the above mentioned plugins navigate to > Tools > Import and click on 'WordPress' in the list of import tools. On the next page click the browse button and select the content.xml file that came with the theme. Then click on 'Upload file and import'. Tick the checkboxes to download the media and assign the users to your one. Downloading all the media can take a while so please be patient. Please don't navigate away from the page until you see the message that the import was successfull!
Importing widgetsettings
To install the widget content go to > Tools > Widget Importer & Exporter and click the browse button to select the widgets.wie file that came with this theme. Then click the 'Import Widgets' button.
Import the customization settings
Last, navigate to > Appearance > Customize and open the section "Export/Import" at the bottom of the sidebar. Then select the customize-settings.dat file of the demo you want to import, tick the "Download and import images files?" option and click on > Import.
Assign menus
Unfortunately, you have to assign the menus manually. If your themedemo has a extended header (content above the logo and mainmenu) navigate to > Appearance > Widgets, open the "Header Right" widget area and assign the menus "shopmenu" and "languageswitch" via the dropdown to the Custom Menu widget.
Then assign the mainmenu by navigationg to > Appearance > Menus, select the "mainmenu" from the dropdown at the top and click >Select. When the menu is visible on the right scrol down to the end of the page an tick the checkbox for "Main Menu" to assign this menu to the main menu position. Then save your settings by clicking >Save Menu.
Setting the homepage & blog
To set the startpage and the blog page navigate to > Settings > Reading and click the radio button for 'A static page'. Then select the 'Home' page in the Front page dropdown and the page 'Blog' from the Post page dropdown. Then click 'Save Changes'.
Importing the Revolution Slides
If you want to import the slides of the Revolution Slider too, close the customizer (via the X at the top left corner), and navigate to >Revolution Slider. Then click on > Import Slider and select the sliders .zip file that you can find in the demo content folder too.
Hint: Assign WooCommerce pages
Please note: When you've imported the shop pages too and installed & activated the WooCommerce plug in for the shop make sure you assign the page "Shop" at > WooCommerce >Settings > Product tab > Display to the "Shop Page". Just select the page "Shop" from the dropdown.
The details to set up the rest of the WooCommerce can be seen here.
Themesettings
The theme settings give you the opportunity to change the appearance of the theme and to customize it to your needs. Navigate to > Appearance > Customize to open the customization panel.Please note:
- Google Analytics Code
Unfortunately, Envato (Themeforest) does not allow us to include an option to implement Google Analytics code via the theme customisation panel anymore as they want to separate theme functionality and plugin functionality. If you want to implement Google Analytics code please us a plugin for this. - Custom Code
On Envato (Themeforest) request we had to remove the option to implement custom code via the customisation options of the theme. Fortunately we were able to implement a file in the /js folder of the theme called custom_code.js. Add any custom JavaScript code there. (Like Google Analytics code)
Menus
- Main Menu
The mainmenu of your page. Assign the most important items here.
General Settings
- Disable Responsive Version
Tick this checkbox to disable the mobile optimised version of the theme. You will then show your website visitors only the desktop version of the theme no matter what device they are using. - Enable Right-To-Left Design
Tick this checkbox to switch the theme to the Right-To-Left version. You only need this when you're writing from right to left! - Disable Fullwidth Slider on Homepage
Tick this checkbox to display the slide on the homepage not fullwidth and inside the design grid - based on your Revolution Slider settings. - Disable Eternal Scroll
Tick this checkbox to disable the infinite scroll functionality on the shopstream, blogstream and searchresult page. You will see the pagination on these pages again if eternal scroll is disabled. Otherwise you can just scroll down and the content of the "following" pages will be loaded continuously without the need to click. - Disable Content Background
Tick this checkbox to remove the background behind the content area. - Disable Grunge Background
Tick this checkbox to remove the grunge party in the background which overlay the background image. - Disable Logo
Tick this checkbox to hide the logo. - Enable Sticky Menu
Tick this checkbox to enable a menu that "sticks" to the top of the browser even when scrolling down. - Logo
Upload your sitelogo here. - HiDPI (Retina) Logo Width in Pixels
Enter the width in pixels if you've uploaded a HiDPI Version of your Logo. E.g. upload a Logo with 400 x 150 and enter 200 for the width to show it scaled down and crisp on retina devices. - HiDPI (Retina) Logo Height in Pixels
Enter the height in pixels if you've uploaded a HiDPI Version of your Logo. E.g. upload a Logo with 400 x 150 and enter 75 for the width to show it scaled down and crisp on retina devices. - Navigation Font
Select one of the over 50 preselected Google Fonts that you want to use for your main navigation. - Font
Select one of the over 50 preselected Google Fonts that you want to use for your website. - Hide Background Image
Tick this checkbox to hide the sites background image. - Enable Background Image Cover
Tick this checkbox to stretch the background image to cover the browsers full width. Leave it unchecked if you want to repeat your background image. - Background Image
Upload your sites background image. - Background Color
Set a solid background color for your site. Please note that a set background image will cover the color. - Border Radius
Enter a number that you want to use for the border radius of preselected elements like buttons and product images.
Header Settings
- Enable Header Background Color
Tick this checkbox to set the a background color to the header. - Header Background Color
Set the header background color via the colorpicker. Make sure the checkbox 'Enable Header Background Color' is ticked. - Enable Extended Header
Tick this checkbox to enable the two widget areas 'Header Left' and 'Header Right'. They will appear above the container with the sites logo and the main menu. - Enable Boxed Header
Tick this checkbox to display the header in boxed layout. Untick to display it full-width. - Enable Header Bottom Shadow
Tick this checkbox to show a box shadow at the bottom of the header. - Sticky Menu Background Color
Set the background color for the sticky menu that appears when you scroll down. - Sticky Menu Background Transparency
Set the transparency for the sticky menu background color. It appears when you scroll down.
Color Scheme
- Text Color
The default color of your text. - Mainmenu Text Color
Set the color for the main menu. - Mainmenu Hover Text Color
Set the text color for the main menu when elements are hovered. - Keycolor 1 to 7
Most of the elements of the theme are grouped and uses the same colors. Use this option to change the colors of all elements in this group. Use the preview to get an better understanding of what elements are grouped together. - Content Background Color
The background color of the content area. - Extended Footer Background Color
Set the background color for the extended footer area which appears between the content area and the footer of each page. Set the columns to '0' (in the footer settings) to disable it. - Product Detail Info Background Color
Set the background color for the product details that appear in a dedicated container on the detail page of a product only. - Product Detail Info Text Color
Set the text color for the product details that appear in a dedicated container on the detail page of a product only.
Social Networks
Enter the full URL to your account to show a linked icon of the service in the header of your page.Make sure you don't miss the http:// at the beginning of the URL, otherwise the link will not work! E.g: http://twitter.com/colibrithemes
Leave the field of a network empty to hide it's icon.
Custom Code
- Custom CSS
Paste custom CSS code that you want to get included right in front of the closing body tag at the end of all pages.
Shop Settings
- Show Categories on Productstream
Tick this checkbox to show categories of a product on the shop stream page too. If you untick this option sategories will be listed on the detail page of a product only. This option is handy to gain extra space if you have very long product titles and need some extra space on the shop stream page. - Hide Productimages
Tick this checkbox to hide all the product images. Use this option if you don't want to use product images in your shop. - Disable Product Image Hover Effect
Tick this checkbox to disable the slide effect of the first gallery image when you hover a product on the shop stream page. - Shopstream Pagetype
Select where you want the sidebar on the shop stream page to appear. Left, right or full with for no sidebar. - Enable Long Price Mode
Tick this checkbox to display the prices not next to the product name and category on the shop stream page but one line below. This allows you to enter much longer amounts and currency symbols. - Number of products per page
Set the number of products you want to display per page in your shop.
Catalogue Settings
The catalogue settings come in handy when you want to use the WooCommerce plugin to create, manage and display products but without the option for users to purchase them.- Hide Cart button in header
Hides the cart-layer button in the head area that shows the content of the users cart when hovered. - Hide "Add to Cart" button on product page
Hides the "Add to Cart" button on the products detail page. - Hide "Add to Cart" button on Stream page
Hides the "Add to Cart" button on the stream pages like shop, home etc. - Hide prices (Stream page + Widgets)
Hides the prices on all pages except the products detail page. - Hide price on product detail page
Hides the price on the products detail page.
Footer Settings
- Number of columns in the extended footer
Select the number of columns you want in the extended footer for your widgets. Select 'none' to hide the extended footer completely. - Number of columns in the footer
Select the number of columns you want in the footer for your widgets. Select 'none' to hide the footer completely. - Footer Headline Color
The color of the footer Headline. - Footer Background Color
The color of the footer background. Make sure no background image is set if you want to use the background color. - Footer Background Image
The background image you want to use in the footer. It's repeated vertically and horizontally. - Footer Text Color
The color of the footer text. - Disable Copyright Bar
Tick the checkbox to hide the copyright bar below the footer area. - Copyright Text Color
The color of the copyright text. - Copyright Text Color
The color of the text in the copyright area. - Copyright Background Color
The color of the copyright background area.
Setup of the navigation
This theme comes with one menu:- Main Menu
The mainmenu of your page. Assign the most important items here.
To set up the menu navigate to Appearance > Menus. Click the 'Create a new menu' button at the top and enter a menu name for the menu, than click Create Menu. After that you have to assign it to the positions you want it to appear at. If you're importing the themedemo content the mainmenu will also be imported and you only need to assign it to the Primary Menu position.
Use the Main Menu location for your main navigation.
To add pages to your navigation tick the checkboxes at the pages (in the 'Pages' Box) that you have already created. Then click the 'Add to Menu' button. To generate a sub-navigation element drag it below the parent element and a bit to the right. It will snap in as a child of the parent navigation element. See http://support.WordPress.com/menus/ for further details.
Please note: You can always create more menus and display them with the 'Custom Menu' widget on the widget page. Use this for example to create a special shop menu in the extended header with elements like "Whishlist"and "Login / My Account".
Megamenu
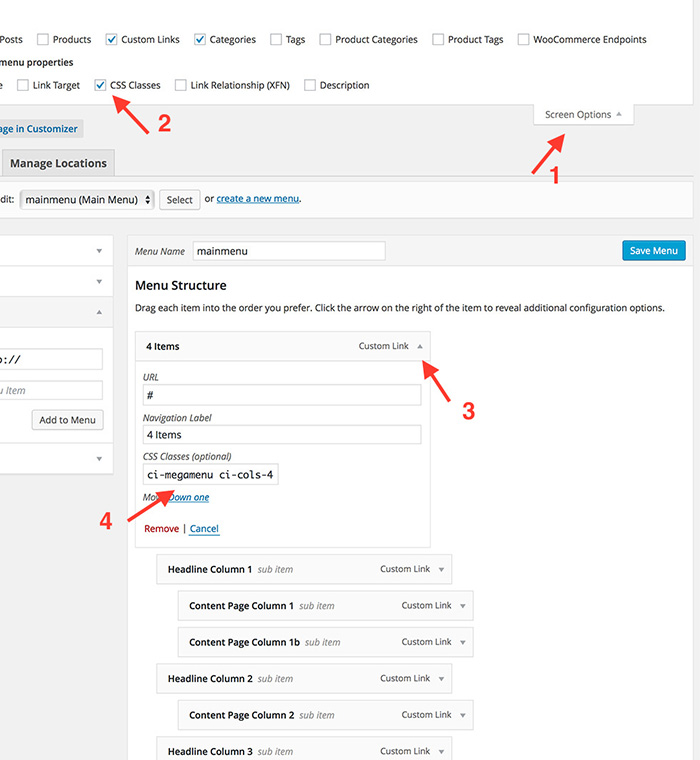
The theme comes with a mega menu which lets you create a "drop down" navigation that has up four columns.To activate it make sure you've enabled the "CSS Classes" for the pages. To do so, open the "Screen Option" panel in the upper right corner of your wordpress. Then make sure the "CSS Classes" option is ticked. If the option is enabled you will find an input field "CSS Classes (optional)" at every page when you open it's attributes.
To enable the megamenu option for this page add the class ci-megamenu. Additionaly add the class to set the number of columns. ci-col-1, ci-col-2, ci-col-3 or ci-col-4. Seperate both classes with a space. So the classes to enable the mega menu and mace it 4 columns would look like this: ci-megamenu ci-col-4
Each subpage one level below the current page will be used as a headline for a column. Subpages of this page will be shown as content of the column.
Setup of the blog
To set up the blog page navigate to Pages > Add New. You can name it as you like and give it any content. Then navigate to Settings > Reading, select 'A static Page' and select the page you have just created as 'Posts page'. If you've imported the democontent, a page named 'Blog' is already created and you only need to assign it as described before.To add a new blog post navigate to Posts > Add New. Give it the name you like and insert your content. If you want to display an image in the list of posts add it as featured image. To set up the featured image click 'Set featured image' and select an image from your Media Library or upload a new one. Click 'Use as featured image' to use it as featured image for the blog post. It is best to use featured images with a dimension of at least 900px width.
To add a Rev Slider or Video add the Rev Slider shortcode or YouTube/Vimeo embed code in the field for the "Postheader Content". It will then replace a featured image if both are set.
Multilingual
The theme is prepared to be translated into different languages and comes with .mo and .po files for easier translation. If you plan to translate all of the theme from english to just one other language you can follow the standard way of translating a WordPress theme. No extra Plugins are required.If you're planing to translate the theme to more than one language to use them simultaniously you need a 3rd party plugin that does not come with the theme. We recommend to use the very popular and famous WPML plugin that we've used for the development too.
Please note, that there are hundreds of translation plugins available on the internet we can't support you with further details on how to set them up correctly.
WooCommerce
If you want to use the shop functionality of the theme you need to install the WooCommerce plugin. Read here if you don't know how.Please set up the WooCommerce plugin according to its manual and make sure you've selected the right page (e.g. "Shop") from the "Shop Page" dropdown. You find this at > WooCommerce > Settings > Products tab > Display.
Furthermore, you need to set the pages for the cart page, checkout page and the terms and conditions. This can be done at > WooCommerce > Settings > Checkout tab.
Please note: If you set up WooCommerce with the WooCommerce wizard AND import the democontent of the theme, you will have some pages used for the shop twice. This can lead to confusion as ther will be zwo pages called 'Shop' but WooCommerce will use another shop page to setup the shop as we've linked in the predefined navigation - due to technical reasons.
Please remove the duplicated pages manually via > Page and make sure the correct pages (Shop, Cart, Wishlist, Checkout, Terms & Conditions) are assigned in the WooCommerce Settings.
The only theme specific setting are the image sizes.
Image Sizes
To set the theme specific image sizes make sure you have installed the WooCommerce plugin. Then navigate to > WooCommerce > Settings, click the 'Products' tab and select the "Display" category. Set the following:
Catalogue Images: 570 x 570 - Check the 'Hard Crop' option (if you don't want to support HiDPI screens 285 x 285 'Hard Crop' is fine too)
Single Product Images: 650 x - 650 Check the 'Hard Crop' option
Product Thumbnails: 90 x 90 - Check the 'Hard Crop' option
Please note, that WordPress generates images in a new size only when they are uploaded. This means, that when you import images from an existing system or when you install the theme on an existing system you need to regenerate all shop images in the new size. You can easily do that with a plugin like this: Regenerate Thumbnails.
Plugins
To get the most out of the theme we recommend you to use the following plugins. You will also find a notice in the backend that let's you easily install all the required and recommended plugins at once.- Revolution Slider
A very popular slider that comes free with this theme. - Visual Composter
A very handy plugin that lets you creat your content with drag & drop. Comes free with this theme. - WooCommerce
A plugin to implement a webshop into your existing WordPress installation. Download - YITH WooCommerce Wishlist
A plugin to add a wishlist feature to your woocommerce shop. Download - WPML Multilingual
The state of the art plugin when you need to translate your WordPress site. Download
- WordPress Importer
The standard tool to import content .xml files (e.g. the themedmeo content.xml). Download - Widget Importer & Exporter
A tool to import and export widget settings (e.g. the themedemo widgets.wie). Download - Regenerate Thumbnails
A plugin to regenerate all the images of the site based on the image site settings from the backend. Download - Customizer Export/Import
A plugin to import the setting of the customization page (e.g. the themedemos customize-settings.dat). Download
Installing Plugins
To install a plugin go to > Plugins > Add New. If you already have a file with that plugin, click Upload at the top. Then hit the Browse button, select the .zip file you've downloaded and click 'Install Now'.After the file has been uploaded to your server you have to activate it by clicking Activate.
You find the installed Plugins at > Plugins > Installed Plugins. If you want to remove a Plugin you have to click the Deactivate button of that plugin first. After that a Remove button appears.
Widgets
Widgets are little items you can use to display all kind of content in specified areas of your website without writing a single line of code.Navigate to Appearance > Widgets and drag & drop the widget you like onto the area on the right you want it to appear at. (If accessibility mode is disabled.) Otherwise use the 'Add' button.
Existing widget areas
This theme comes with eight widget areas.
- Header Left
Widgets appear always on the left side of the extended header. Make sure you've enabled the extended Header at > Appearance >Customize in the 'Header Settings' section. - Header Right
Widgets appear always on the right side of the extended header. Make sure you've enabled the extended Header at > Appearance >Customize in the 'Header Settings' section. - Blog
Widgets appear on the blog pages only - in the blogstream as well as on the blog post pages. - General
Widgets appear on all 'general pages' in the sidebar. General pages are pages that doesn't belog to the shop or blog. - Shop
Widgets will appear on the shop sidebar only. - Checkout Sidebar
Widgets will appear on pages with pagetype 'Checkout sidebar' only. - Extended Footer
Widgets will appear at the end of every page above the footer. Make you've set the number of columns at > Appearance >Customize in the 'Footer Settings' section. - Footer
Widgets will appear at the end of every page in the footer. Make you've set the number of columns at > Appearance >Customize in the 'Footer Settings' section.
If you have questions that are not answered in this manual post in our Support Forum.